
Mod #1 - CAS Trait
Finally. Finally. Let’s make our first mod.
Preview
Section titled “Preview”The final mod will create a new CAS trait called Radical.

Making the Tuning
Section titled “Making the Tuning”Open tdesc.lot51.cc and create a new Trait tuning. Set the name of your tuning, which for me will be ZMilla:RadicalTrait.
Now let’s add the minimum required fields to get our trait to show up in CAS.
display_name- The name of the trait. Use0x2D8777C7forAwesome!trait_description- Tooltip description. Use0x89F40002forI trust in my awesomeness.ages- List of ages that can have the trait. Required for CAS.- I’ll add
YOUNG_ADULT,ADULT, andELDER
- I’ll add
species- Species that can have this trait. Required for CAS. AddHUMAN.occults- Occults that can have the trait. Required for CAS. AddHUMAN.icon- The icon. Use2f7d0004:00000000:cfc547bc4742a87afortrait_CoolGuy.png.tags- There are hundreds of tags for different things. We need to one to define the CAS trait category. Add one of the following:TraitGroup_Emotional,TraitGroup_Hobbies,TraitGroup_Lifestyle, orTraitGroup_SocialTraitGroup_Emotionalis first, so it’s easiest to test with
Here’s a look at the final XML:
<?xml version="1.0" encoding="utf-8"?><I c="Trait" i="trait" m="traits.traits" n="ZMilla:Radical" s="4166051917"> <L n="ages"> <E>YOUNGADULT</E> <E>ADULT</E> <E>ELDER</E> </L> <T n="display_name">0x2D8777C7<!--Awesome!--></T> <T n="icon" p="InGame\UI\Icons\CAS\Traits\trait_CoolGuy.png">2f7d0004:00000000:cfc547bc4742a87a</T> <L n="occults"> <E>HUMAN</E> </L> <L n="species"> <E>HUMAN</E> </L> <L n="tags"> <E>TraitGroup_Emotional</E> </L> <T n="trait_description">0x89F40002<!--I trust in my awesomeness.--></T></I>Making the Mod
Section titled “Making the Mod”Now we need to add the tuning files to a .package file.
- In lot51.tdesc.cc, click
Download TuningANDDownload SimData - (Optional) In Sims 4 Editor, you can create a new empty environment for easier testing.
- In Sims 4 Editor, open the package editor, enable editing, then create a new package
- Make sure the new package is in your
Modsfolder
- Make sure the new package is in your
- Click
Importand import both files from step 1, then save- You can also drag & drop files into S4E!
That’s it! A working mod! Our package contains tuning XML that defines a new trait, points to existing game resources, and is backed by SimData.

Modding the Mod
Section titled “Modding the Mod”Having a working mod is awesome, and you should feel proud if you’ve made it this far. Congratulations!
There’s a small problem though… this mod just points to existing game data. That’s boring. Let’s fix it!
String Tables
Section titled “String Tables”Let’s customize the trait’s name and description using string tables.
- In the S4E package editor, click
Createand change the type toString Table. - (Optional) When making a mod you plan to release, use the
All Languagesoption to create linked tables for all languages. - Select the English (or your native language) table, and click the
+button to create new entires. New entries are added to all linked tables. - Create two entries, one for the trait name, one for the description.
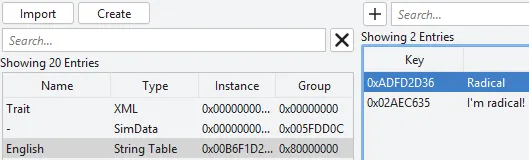
- In both the XML and SimData resources, update the
display_nameandtrait_descriptionfields with the keys you just created. You can copy keys from the string table editor.-
<T n="display_name">0xADFD2D36</T><T n="trait_description">0x02AEC635</T>
-
Because traits are sorted alphabetically, your trait will likely have moved in the list.

DDS Images
Section titled “DDS Images”Images referenced by tuning use DDS format, but S4E also supports converting to and from other image types. We’ll export the image we’ve already been referencing, edit it, then reimport it with a new resource key.
- On the S4E homepage, open the Game File Browser, select the Icon Browser tab.
- While any icon should work, search
trait_CoolGuyto find the one we’ve been using. - Right click the image and export to a DDS or PNG.
- Edit the image with an editor like GIMP or photoshop.

Generating an Instance
Section titled “Generating an Instance”The exported file was named trait_CoolGuy-0xCFC547BC4742A87A.dds. When importing files with S4E, the instance will be taken from the file name, and the type will be inferred from the file extension. Use this feature if ever want to manually set instances.
For images, you can exclude an instance entirely, and one will be generated using the file name. Internally, it uses the FNV hash of CreatorName:PackageName:FileName. I’ll rename my image to trait_Radical.dds.
Importing and Referencing
Section titled “Importing and Referencing”Now we need to import the image into our package and tell our tuning files to use it.
- Click
Importand select your edited DDS file (or drag and drop). - Right click the new DDS resource and select
Copy > Copy Instance - In the tuning XML AND SimData, update the
iconfield with the new DDS resource key.- Only the instance changed, so just editing the last part of the key is enough.
<T n="icon">0x2f7d0004:0x00000000:0x835ACA909C22EAEA</T>Finally, a fully customized tuning mod!
Example Mod
Section titled “Example Mod”The Takeaway
Section titled “The Takeaway”While the mod we made is very simple, it shows some very important concepts.
- Resources can reference other resources using
Resource Keys - Some resource types, like string tables, use a resource specific key.
These concepts hold true for more complex mods. Tuning files can reference other tuning using tuning IDs, or reference things like sound and animation using resource keys.
There’s thousands of tuning descriptions, and hundreds of thousands of tuning files. In the next article, we’ll look more at exploring this massive dataset in a manageable way.